

Here is a simple and quick project that can add a nice touch to a room. If you have small children (or even if you don’t), chances are you have cardboard tissue boxes in several rooms in the house. You can easily make those boring boxes match your decor by sewing a simple cover. Here is how you do it…
What you will need:
> 1/4 yd of fabric (quilting cotton or home decor fabric will work best)
> 1/4 yd of medium weight fusible interfacing
> Empty Tissue Box
Step 1: 
2. Add 1 inch to each measurement for a 1/2 inch seam allowance (5 1/4 x 6 1/4).
Step 2:
1. In order to maintain a continuous look around the box cover, you will want to start with one piece of fabric and cut out all four side pieces in a row. The length of this piece of fabric will need to be the width of the tissue box (plus seam allowance) x 4. Mine measured 21” (5 1/4 x 4). The width of this piece of fabric will be the height of the tissue box (plus seam allowance). Mine was 6 1/4”.
2. Cut the interfacing the same length but make the width 1” narrower so the seams will not have interfacing on them. Mine measured 5 1/4 x 21”.

1. Center the interfacing on the wrong side of the fabric strip and iron it.

Step 4:
1. Now cut two pieces of fabric the size of the top of the box plus 1” for seam allowance. Mine measured 4 1/4 x 4 1/4, so I cut two pieces 5 1/4 x 5 1/4.

2. Cut one piece of interfacing the same size and iron it to one of the pieces (the one you wish to be the top of the cover).
Step 5:
1. Take the empty tissue box and open it up. Cut out the top square with the hole and center it on the interfaced piece of top fabric (interfaced side up).
2. Using a pencil trace the opening. This will be your sewing guide.

3. Now you have all of your fabric prepped and you are ready to sew!

Step 6:
1. Place the two top pieces right sides together and sew along the guide you made.


Step 7:
1. 
2. Iron the seam to create a perfect oval.

3. Finish the opening by edge-stitching the opening.


1. Sew the 4 sides together to create the cover starting with 2 pieces that match up. Place them right sides together and sew the matching sides using a 1/2” seam allowance.

3. Complete the cover sides by sewing the first panel to the last.

S
1. Turn up the bottom of the “box” 1/2 inch to create a bottom seam. Iron and top-stitch.


**If you wish, you can turn the seam under to make it a bit cleaner. I decided not to only because 1- you won’t see it, and 2 – there won’t be a lot of “abuse” on this seam that you NEED to do it.

1. Pin the top (right side down) to the top of the box (right sides facing inwards).

3. Turn the box right side out and press each seam to get a crisp crease.
You’re Done!
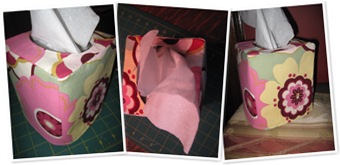
Have fun! This project took me about 25 minutes and that was with taking pictures….you can probably get it done in under 20 (after you do it once or twice).
Hi
ReplyDeleteThis looks great. I will be trying it out in the morning.
Many thanks.
Thanks! Please share a photo of your completed tissue box cover! http://www.flickr.com/groups/sharedsewplicity/
Delete