I am super excited about this tutorial! If you've ever looked at your child's artwork and thought to yourself, "I really need to save that!" but knew that putting another piece of paper in the memory box wasn't the answer, this tutorial may be what you are looking for.
We're going to stitch the artwork onto a piece of fabric so it becomes permanent! This tutorial will show you step by step how to take a picture drawn on a piece of paper and sew it onto a piece of fabric which you can make into a pillow, quilt or simply frame.
The best part is that you do not need to purchase that expensive photo fabric for this project! You will be printing directly onto the fabric!
What You Will Need:
- Artwork
- Computer w/scanner
- Editing Software (Paint, Photoshop, Aperture, etc.)
- Fabric (canvas, linen, muslin all work well)
- Freezer Paper
- Iron
- Ink Jet Printer
- Fusible Fleece
- Sewing Machine with Free Quilting Foot (OR Needle & Thread if hand-sewing)
- Thread (colors of the artwork)
STEP 1 - Upload the Art
Scan the child's artwork into your computer and open it in your editing software. Resize the art so it fits onto an 8x10 piece of paper maintaining a 1/2" - 1" border around the artwork (You can see, I did not do this.)
STEP 2 - Prepare your "Paper"
Cut a piece of fabric larger than 8.5 x 10" (you will trim later). Tear off a piece of Freezer Paper large enough to cover the fabric.
Once the freezer paper is securely adhered to the fabric, trim the
fabric/freezer paper duo to the size of your printer paper (8.5x11").
Make sure it is exact!
STEP 3 - Print
Place the
fabric/freezer paper in your printer as you would a piece of paper.
Just make sure that you put it in so that the printer prints on the
fabric side, not the freezer paper side! For my printer that means
placing it in fabric face down.
PRINT!
Now you can go ahead and remove the freezer paper.
If you are using a fabric that frays easily, you may want to serge or zig zag the edges before proceeding.
STEP 4 - Back & Sew!
Iron a piece of fusible fleece to the back of your fabric.
*You don't have to do this step, but it really makes a difference!
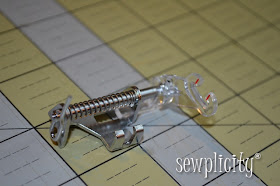
If you are going to hand-sew, grab your needle and thread and start stitchin', if you are going to machine sew, grab your free motion quilting foot...it looks like this:


Put it on your machine and drop your feed dogs. Set your machine to the appropriate setting. If you haven't used this you will want to practice a bit. This is exactly what the name indicates...a FREE MOTION quilting foot. It goes any which way you want it to. It takes a little practice, but one you get the hang of it, the sky is the limit!
Trace over the lines of the drawing. I just used black thread, but you can use any color, or mix of colors. Take your time and have fun! TIP: Use the start and stop points that the child did, it will make for a more fluid look and feel.
Once you finish up, trim any loose thread and either frame it, like I did, or make it into something!
You may want to add a date as I did. You can either write it or if you have a machine that offers simple letters and numbers stitch it!
Artwork that will last forever!


No comments:
Post a Comment
I would love to hear from you!