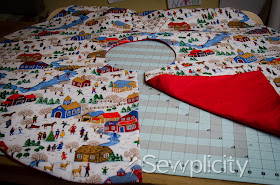
WHAT YOU WILL NEED:
1.5 yards of fabric for the front
1.5 yards of fabric for the back
1.5 yards of batting or fusible fleece
String (about 25" long)
Pencil
Pinking Shears
This was the PERFECT project for my vintage holiday fabric that my Mother-in-law gave me a few months back...
STEP 1: Cut Fabric
Start out by making perfect squares of your fabric yards. Fold one corner up to meet the other side like so:
Cut off the excess to square the fabric. Unfold and fold in half to make a rectangle.
Now fold in half, bringing the shorter ends together making a smaller square. (Folded edges are on the bottom and left).
Bring up the right lower corner to meet the left upper corner, creating a triangle.
now bring down the upper left corner to meet the folded edge on the bottom of the triangle. As you can see, the top edges will not align - this is correct!
Tie a pencil to the end of your string. Hold the other end of the string at the point of the triangle and let the pencil fall just before the edge of the shorter raw edges.
Keeping the string taught, draw the natural curve that the string follows. Make sure the entire curve is on all layers of the fabric. (You have basically created a homemade compass).
Cut along the curved line you just drew.
When you unfold, you will have a perfect circle!
Repeat this for the other piece of fabric and the batting/fusible fleece.
Next you need to create the hole in the center for the tree. Take one of the triangular pieces and measure 4" from the point.
Using the string and pencil, (or a series of points 4" along the width of the point) draw the curved line to create a circular mark.
Cut.
Repeat for the other piece of fabric and the batting/fleece.
STEP 3: Iron Fleece or baste batting
If using fusible fleece, iron it to the back of one of your fabric circles. If using batting, you can use a basting stitch along the edge to hold it in place.
STEP 4: Cut Opening
Place the two fabrics right side together and pin.
Using a straight edge, cut a straight line from the inner circle to the outer edge.
Pin
Step 5: Sew
Starting about 1/4 way down one of the straight edge sides, sew around the entire skirt closing up all edges. When you get back to the edge you started on, leave about 4" open. Back tack at start and finish.
Use pinking shears (or cut notches) all along the seam allowance of the inner circle. You can trim around the outer edge as well to reduce bulk.
Turn right side out and press.
Step 6: Finish
Finish the skirt by top-stitching around the entire perimeter, closing up the opening. If desired, you can top quilt with lines or design stitching. I left mine as is.


So.... if your print is one-way then, half of your circle has the print upside-down?
ReplyDeleteYes, a one directional print will end up upsidedown on 1/2 the skirt. You can place your slit at the back to help - or use non-directional fabric.
DeleteTitanium Arrows | TITIAN ART - TITIAN ART
ReplyDeleteTITIAN ford focus titanium hatchback ART is a aftershokz trekz titanium text printing nier titanium alloy by TITIAN titanium chain ART. Copyright © TITIAN ART LLC 2014: 100% UPC: schick quattro titanium 07947405740.