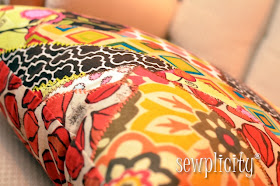
Crazy Patchwork....Crazy Quilting...
Whatever you may call it, it's basically a free-form way to piece together fabric scraps and give you a reason to use all those fancy, fun decorative stitches on your machine!Ready to learn how to do it? Grab a bunch of your fabric scraps, a piece of muslin, a straight edge and some fun colorful thread.....
For the purposes of this tutorial I made a patchwork pillow, but you can make anything you want! A bag, a table runner, an apron or even a quilt!
STEP 1: Preparation
- Cut your muslin to the dimension you need your patchwork fabric to be. I made an 18" pillow cover, so I cut myself an 18" square of muslin.
- Go through your scrap pile and make sure that you have straight edges to work with....don't worry about length, width, shape, etc....just make sure they have some straight edges. (A rotary cutter is your friend here)
STEP 2: Get Started
- Decide which scrap will be your first piece and cut it so it has 5 straight edges. There need not be any rhyme or reason to the shape, you will just want 5 straight edges to work with.
- Lay this piece face up on the muslin. It does not need to be centered, but you will want space all around it.
- Next take another scrap and lay it face down on top of the first piece lining up on of the straight edges.
- Pin in place and sew a 1/4" seam down the lined up edge (top piece, 5 edge piece and muslin). Sew just as far as the edge of the bottom piece here - you don't want to stitch the very top piece directly to the muslin without the center piece in there!
- Press the seam open so it lays flat on the muslin (see that little top corner that extends past the edge of the polkadot fabric? It is NOT sewn to the muslin....You can trim this off, or just leave it because it will get covered up with another piece of fabric.
STEP 3: Piece All Scraps
- Move to another side of the 5-edged piece and repeat...this time you can cover up some of the other piece of fabric
- Continue working around that first piece layering and sewing...use different shapes and size scraps as you go to create interest.
- Don't worry about having your scraps come over the edges of the muslin - you will trim this excess off....just work until you have the entire muslin covered.
- Once the entire muslin is covered, turn your pieced work over so the muslin is facing up.
- Use your straight edge and rotary cutter (or scissors) to trim off any excess fabric.
- Iron flat and baste the edges
STEP 5: Decorate!
 |
| If you want to learn about the thread I used here, check out my post on Things Crafty. |
- Now get out all that fun, colorful thread and pick some of those decorative stitches on your machine and sew all of those seams.
- Get as crazy and eclectic as you like, or keep it simple and clean - the choice is yours!
- Once you finish that, use your crazy patchwork just as you would any piece of fabric.
It is so much more interesting than a plain piece of fabric, and better yet, you just used up all those scraps that were otherwise sitting around your sewing room!
Most importantly, have fun....don't worry about measuring, angles, etc. Make a mistake? Work with it - get creative....get CRAZY!!!!


Thanks for the tutorial! I'm using the same technique for a children's book cover... Your pillow turned out amazing
ReplyDeletewell done, it looks lovely
ReplyDelete