
 Do you own a DSLR (Digital Single Reflex) camera? If so, I'm about to make you very happy! I was in desperate need for a case for one of my lenses so guess what I did....yup....I made one. And now I'm going to share the how-to with you. Believe it or not it is not difficult at all, and if you have no need for a dslr lens case, well - then you can apply this tutorial to make a very nicely lined wine bag (why not?)!
Best part - no zippers folks! I know many people are hesitant to work with zippers so this case uses cord instead. Easy peasy. Ready?
WHAT YOU WILL NEED:
> Ruler
> Protractor, guide or something to make a perfect circle
> Calculator (for a little math)
> Fat Quarter of fabric for exterior
> Fat Quarter of minky or other soft fabric for interior
> Scrap batting
> Piece of plastic or Cardboard (optional)
> 24" of cording (I used a shoelace I had lying around for about a year - YES!)
If you have a serger, you will want to use it, but it is not necessary.
STEP 1: Determine fabric measurements
OK - this is going to be the toughest part...
BOTTOM: The best way to get a great fitting case is to use an existing one that you already have and measure the diameter of the bottom circle and add 1" to allow for seam allowances. If you don't have one on hand, you are probably safe with a 5" circle. This will give you a 4" bottom.
LENGTH: Measure the length of the lens you are making the case for (mine was 7") and add 3" which will give you extra space at top and seam allowances. (My length was 10")
WIDTH: You need both side pieces to sew together to match the diameter of the bottom...here is where you need to do a little math. Circumference = Pi (3.14) times Diameter (C=pD)
But you don't need to know that fancy math stuff.....just take your bottom diameter (seam allowance included) and multiply it by 3.14 then divide that by 2. here is my math:
5 x 3.14 = 15.7
Now, divide that number by 2 (you are making two sides)
15.7 / 2 = 7.8
Feel free to round this number to the nearest 1/4" - So the width of my two sides will be 7.75"
STEP 2: Cut your fabric
Using your measurements (or mine) cut the following:
Exterior & Interior Fabric:
> 2 Sides: (LxW) or my measurements (10" x 7.75")
> 1 Bottom Circle (5" diameter)
Batting:
> 1 Bottom Circle (5" diameter)
Plastic or Cardboard:
> 1 Bottom Circle cut 1.25" smaller than the Bottom Circle diameter - (Using my measurements - 3.75")
(This piece is optional - it is used to add strength and stability to the bottom of the lens case)

STEP 3: Make the bottom piece
Using a 1/4" seam allowance sew the interior fabric to the batting

Next place the plastic piece on top of the wrong side of the exterior fabric

Place the batting/interior fabric on top of that (batting on top of plastic)

Pin and sew around the circle using a 1/2" seam allowance

If you have a serger, serge the edges, if not, trim and zig-zag around the edge.

Put this aside for now.
STEP 4: Make the Sides
Place one exterior fabric piece on top of an interior piece - wrong sides together
Serge together, or zig-zag

Press the top edge down 1/2" on each piece and sew.

Fold each side in 1/2" and sew

Press the top edge over again (about 3/4") and sew about 1/8" from the edge to create the channel for your cording


Place the two side pieces right sides together and sew down each side from about 1/2" from the channel to the bottom (don't sew across the bottom) Reinforce the top by sewing across the seam allowance and backtacking several times (look at the image below)

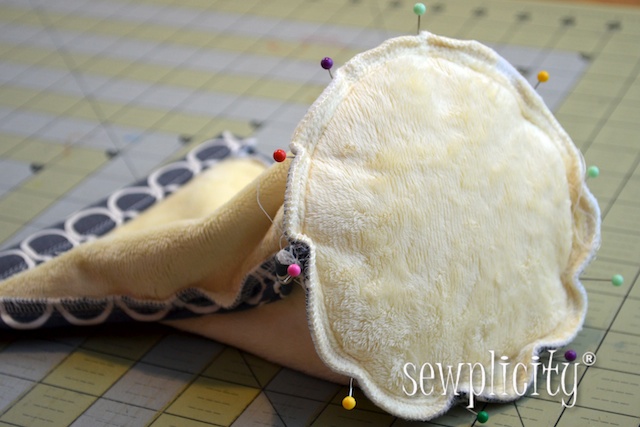
STEP 5: Attach the Bottom
With the insides facing outwards, pin the bottom to the sides and sew
Turn right side out...almost done....

STEP 6: Insert the Cording
Cut the cording so you have 2 pieces that are 12" long. Thread one of these pieces in through one channel, back around through the other (use a safety pin)

No insert the other piece of cording in through the opposite side and back around (Take your time, it may be a little tight with the other piece of cord already in the channel)


Tie the loose hanging ends of the cord on both sides together

And you're FINISHED!


Now you can carry your lenses in a case that is not only protective, but it will fit your style!
And really as I mentioned earlier - if you don't have a lens, you can make one of these for a wine bottle gift bag - just make it long enough and eliminate the batting and plastic/cardboard piece.

My sister told me just today she is thinking of getting a new lens in time for Christmas. Now I know what to make her!
ReplyDeleteThank you for this tutorial.. I was just saying to myself that I need to make me 2 cutesy lens cases. Thanks for the inspiration :)
ReplyDeleteGreat tutorial - I was just looking at my lenses gathering dust on the book shelf (I know bad right) and now I can whip up some cases to keep them clean!
ReplyDeleteI linked you up in my latest blog post too :)
I made this for my dad for christmas! It is great! Thank you!
ReplyDeleteHi, I made your lens case for my husband - here are some photos on my blog and a link to yours too. Thank you!
ReplyDeletehttp://theknittingmoon.wordpress.com/
Thank you!
ReplyDeleteMelanie
I really appreciate your post, and you explain each and every point very well. Thanks for sharing such information. CM NF
ReplyDeleteI really appreciate your post, and you explain each and every point very well. Thanks for sharing such information. Commlite cm-nf-mft
ReplyDelete